

Finding a healthy, delicious, and easy-to-make snack can be a challenge, but these banana oatmeal bars check all the boxes! Whether you’re looking for a nutritious breakfast option, a pre-workout energy boost, or a wholesome treat for kids, this recipe delivers the perfect balance of flavor, texture, and health benefits.
Packed with ripe bananas, hearty oats, and natural sweeteners, these bars are gluten-free, dairy-free, and highly customizable. Plus, they require minimal ingredients and can be made in just a few simple steps—perfect for busy mornings or meal prep.
In this guide, we’ll walk you through how to make the best banana oatmeal bars, along with customization tips, storage recommendations, and answers to common questions. Let’s dive in and bake a batch of these chewy, satisfying, and nutrient-rich bars!
Why You’ll Love These Banana Oatmeal Bars
These banana oatmeal bars aren’t just easy to make—they’re also packed with nutrients, natural ingredients, and irresistible flavor.Here’s why you’ll love having them as your new favorite snack!
Healthy & Nutritious Ingredients – Made with bananas, oats, and natural sweeteners, these bars offer a wholesome alternative to store-bought snacks without refined sugars or preservatives.
Perfect for Breakfast or Snacks – Whether you need a quick breakfast, post-workout energy boost, or kid-friendly lunchbox treat, these bars are filling, satisfying, and portable.
Customizable & Versatile – You can add nuts, seeds, chocolate chips, or protein powder to suit your taste and dietary needs. Want a vegan or gluten-free version? It’s easy to adjust!
Naturally Sweetened & Gluten-Free Options – These bars use honey, maple syrup, or mashed bananas for sweetness—no processed sugar needed! Plus, using certified gluten-free oats makes them completely gluten-free.
Perfect for Breakfast or Snacks
One of the best things about these banana oatmeal bars is their versatility. Whether you’re looking for a quick breakfast, a healthy snack, or a meal-prep-friendly treat, they fit seamlessly into any routine.
Great for Meal Prep – Bake a batch at the start of the week, and you’ll have a ready-to-eat, nutritious snack whenever you need it. These bars store well in the fridge or freezer, making them ideal for busy schedules.
On-the-Go Energy Boost – Unlike packaged snacks loaded with additives, these bars provide natural energy from bananas and oats, making them perfect for a post-workout refuel or an afternoon pick-me-up.
Kid-Friendly & School-Approved – Soft, chewy, and naturally sweetened, these bars are a hit with kids! Plus, you can make them nut-free for a school-safe snack option.
Customizable & Versatile
One of the best things about these banana oatmeal bars is how easily customizable they are. Whether you want to boost the nutrition, add crunch, or enhance the flavor, there are endless ways to make this recipe your own!
Add Nuts & Seeds for Extra Crunch – Stir in chopped walnuts, almonds, pecans, sunflower seeds, or chia seeds for added texture, healthy fats, and a nutrient boost.
Chocolate Lovers’ Delight – Mix in dark chocolate chips, cacao nibs, or even a drizzle of melted chocolate for a touch of indulgence without making them overly sweet.
Increase the Protein – Want a more filling snack? Add a scoop of protein powder, peanut butter, or almond butter to make these bars perfect for post-workout recovery.
Fruit & Spice Variations – Enhance the flavor with cinnamon, nutmeg, vanilla extract, or shredded coconut, or mix in dried fruits like cranberries, raisins, or chopped dates for natural sweetness.
Naturally Sweetened & Gluten-Free Options
These banana oatmeal bars are not only delicious but also naturally sweetened and easy to make gluten-free, making them a great choice for those looking to avoid refined sugars and gluten.
Naturally Sweetened with Whole Ingredients – Instead of processed sugar, these bars get their sweetness from ripe bananas, honey, or pure maple syrup. You can also use date syrup or mashed dates for an extra fiber boost.
Gluten-Free with Certified Oats – To keep this recipe 100% gluten-free, simply use certified gluten-free oats. Regular oats may contain traces of gluten due to cross-contamination, so opting for a certified version ensures safety for those with gluten sensitivities.
Dairy-Free & Vegan-Friendly Modifications – Want a vegan version? Swap honey for maple syrup or agave nectar and ensure all mix-ins (like chocolate chips) are dairy-free. These bars are naturally dairy-free as long as you use plant-based add-ins.
Lower Sugar Option – If you prefer a less sweet version, simply reduce or omit the additional sweetener—the natural sugars from bananas alone provide enough flavor and sweetness for many tastes.
Ingredients Needed for Banana Oatmeal Bars
These banana oatmeal bars require just a handful of simple, wholesome ingredients, making them an easy and nutritious choice for a homemade snack.
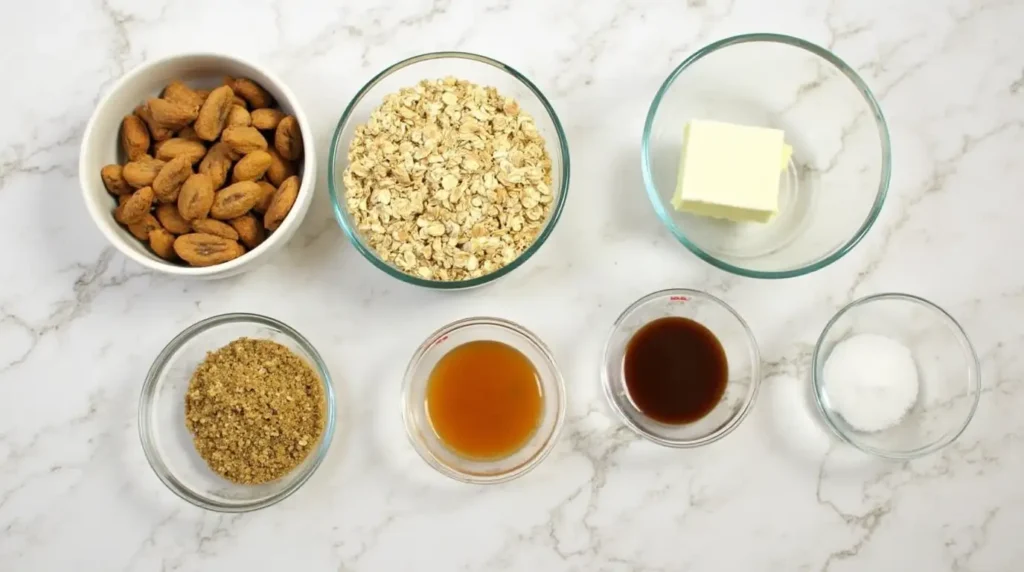
Main Ingredients:
Bananas – Use ripe or overripe bananas for natural sweetness and a soft texture. The more ripe they are, the better!
Oats – Rolled oats or quick oats work best for a chewy texture. Use certified gluten-free oats if needed.
Honey or Maple Syrup – A natural sweetener that enhances the flavor without refined sugar. Choose honey for a richer taste or maple syrup for a vegan-friendly option.
Nut Butter – Peanut butter, almond butter, or cashew butter adds creaminess, flavor, and a boost of healthy fats and protein. Opt for unsweetened, natural nut butter for the best results.
Optional Add-Ins for Extra Flavor & Nutrition
While the main ingredients in these banana oatmeal bars are simple and wholesome, you can easily customize the recipe with optional add-ins to elevate the flavor, texture, and nutritional profile. Here are some ideas to get creative with your bars:
Nuts & Seeds – Add a crunchy texture and a dose of healthy fats, fiber, and protein. Consider:
Chopped nuts like walnuts, almonds, pecans, or cashews
Seeds such as chia seeds, flaxseeds, or sunflower seeds for added nutrition and omega-3s
Chocolate Chips – If you want a bit of indulgence, stir in dark chocolate chips or cacao nibs for a deliciously sweet bite. Chocolate can balance the natural sweetness of the bananas, creating the perfect treat without being overly sugary.
Protein Powder – For a filling snack or post-workout boost, add a scoop of protein powder (whey, plant-based, or collagen) to help keep you full and support muscle recovery.
Dried Fruits & Spices – Enhance the flavor with dried fruits like raisins, cranberries, or chopped dates. You can also add cinnamon, nutmeg, or vanilla extract to elevate the warmth and richness of your bars.
Substitutions for Special Dietary Needs
One of the best things about banana oatmeal bars is their versatility, making it easy to tailor them to specific dietary preferences or restrictions. Whether you’re vegan, gluten-free, or aiming for a lower-sugar option, here are some helpful substitutions to make these bars work for you:
Vegan Alternatives
Egg Substitution: If the recipe calls for eggs, use flax eggs (1 tablespoon of ground flaxseeds mixed with 3 tablespoons of water, let sit for 5 minutes) or chia seeds as a binder.
Sweetener: Instead of honey, use maple syrup, agave nectar, or date syrup—all of which are vegan-friendly options that maintain natural sweetness.
Nut Butter: Stick with peanut butter, almond butter, or sunflower seed butter for a creamy texture and to ensure the recipe remains plant-based.
Sugar-Free Options
Sweeteners: If you’re cutting out sugar, stevia, monk fruit sweetener, or erythritol can be used in place of honey or maple syrup. Keep in mind that these options may alter the sweetness, so adjust to your taste.
Banana Quantity: Increase the number of ripe bananas to boost the natural sweetness. Overripe bananas are ideal as they provide more flavor without the need for extra sweeteners.
Unsweetened Applesauce: If you’re looking for a lower-calorie option that still adds moisture, unsweetened applesauce works as a great alternative.
Flour Variations
Gluten-Free Oats: For a gluten-free version, make sure to use certified gluten-free oats. Regular oats often contain traces of gluten, which could be problematic for those with sensitivities.
Almond Flour or Coconut Flour: If you prefer a flour-based option, you can swap the oats for almond flour or coconut flour for a grain-free version. Just keep in mind that these flour alternatives might require adjusting the liquid ratios as they absorb moisture differently.
Chickpea Flour: For a protein-packed alternative to traditional flour, chickpea flour can be used in small amounts to keep the bars soft and chewy without the gluten.
Step-by-Step Instructions to Make Banana Oatmeal Bars
Making banana oatmeal bars is simple, and with just a few easy steps, you’ll have a delicious and nutritious snack ready in no time. Let’s get started!

Step 1: Prep the Ingredients
Before you begin mixing everything together, it’s essential to prep your ingredients so the process goes smoothly.
- Mash the Bananas – Start by peeling and mashing 2-3 ripe bananas in a bowl. The riper the bananas, the sweeter and more flavorful your bars become. Use a fork or potato masher to get a smooth consistency, but it’s okay to leave a few small chunks for texture.
- Measure Your Oats – Grab your rolled oats (or quick oats, depending on your preference) and measure out 2 cups.
- Preheat the Oven – Preheat your oven to 350°F (175°C) to ensure it’s ready to bake the bars once everything is mixed.
Step 2: Mix Everything Together
Now that you’ve prepped the ingredients, it’s time to combine the wet and dry ingredients for your banana oatmeal bars.
- Combine the Wet Ingredients:
- In a large bowl, add the mashed bananas, 1/4 cup of honey or maple syrup (or your preferred sweetener), and 1/4 cup of nut butter (peanut butter, almond butter, or sunflower seed butter).
- Optional: If you’re using any add-ins like vanilla extract or cinnamon, now’s the time to add about 1 teaspoon for extra flavor.
- Mix all the ingredients until smooth and fully incorporated.
- Mix the Dry Ingredients:
- In another bowl, combine 2 cups of rolled oats.
- For extra texture and nutrients, consider adding 1/4 cup of seeds (chia or flaxseeds) and 1/4 cup of chopped nuts.
- If you want to make the bars even more filling, add a scoop of protein powder or 1/4 cup of dried fruits like raisins or cranberries.
- Optional: Baking powder (1/2 teaspoon) can be added if you want a slightly fluffier texture.
- Combine Wet and Dry Ingredients:
- Gradually add the dry ingredients into the wet mixture, stirring until everything is thoroughly mixed. The dough needs to be thick with a slight stickiness. If it seems too dry, add a splash of water or more sweetener to reach the desired consistency.
Now that your banana oatmeal mixture is ready, it’s time to bake and cool the bars!
- Prepare Your Baking Pan:
- Line an 8×8-inch square baking pan with parchment paper or lightly grease it with a bit of oil or cooking spray. This will ensure that your bars come out easily after baking.
- Spread the Mixture:
- Transfer the banana oatmeal mixture into the prepared pan, and use a spatula or spoon to evenly spread the mixture into all corners of the pan. Press it down gently to ensure it’s tightly packed and forms a solid layer.
- Bake:
- Place the pan in the preheated oven (350°F or 175°C) and bake for 20-25 minutes, or until the top is golden brown and a toothpick inserted into the center comes out clean. The baking time may vary depending on your oven, so keep an eye on it toward the end.
- Cool:
- Once baked, remove the pan from the oven and let it cool in the pan for about 10-15 minutes. This will allow the bars to firm up before slicing.
- After cooling slightly, transfer the bars to a wire rack to cool completely. This helps them set properly and makes them easier to slice into neat squares or rectangles.
Step 4: Serve & Store
Once your banana oatmeal bars are baked and sliced, it’s time to enjoy and store them for later use. Here’s how to keep them fresh and ready for your next snack!
- Serve:
- These bars make the perfect snack on their own, but they can also be paired with a side of yogurt, fresh fruit, or a glass of milk for a well-rounded breakfast or snack.
- For an added treat, warm up a bar in the microwave for a few seconds and drizzle with peanut butter or dark chocolate.
- Store:
- Room Temperature: Store your banana oatmeal bars in an airtight container at room temperature for up to 4-5 days.
- Refrigeration: For longer shelf life, you can store them in the refrigerator for up to 1 week.
- Freezing: To keep them fresh for a longer period, place individual bars in zip-top bags or wrap them in plastic wrap, and freeze for up to 3 months. Just thaw or warm them up before serving.
- Meal Prep Tip:
- These bars are a great meal prep option. Bake a batch at the beginning of the week, and you’ll have a grab-and-go snack ready for busy mornings, workouts, or school lunches.
Tips & Variations for the Best Banana Oatmeal Bars
Here are some handy tips and creative variations to ensure your banana oatmeal bars turn out perfectly every time, and you can customize them based on your preferences and dietary needs!

Make It Vegan
If you’re following a vegan diet, it’s easy to make these bars plant-based:
- Flax Eggs: Instead of regular eggs, use flax eggs. Mix 1 tablespoon of ground flaxseed with 3 tablespoons of water and let it rest for 5 minutes until it thickens into a gel-like texture. This works as a perfect binder in the recipe.
- Maple Syrup: Replace honey with maple syrup or another plant-based sweetener like agave nectar for a vegan-friendly option.
Make Them Gluten-Free
To make your bars gluten-free, use certified gluten-free oats. This ensures the oats haven’t been cross-contaminated with gluten and makes the bars safe for those with gluten sensitivities.
Add Extra Protein
If you’re looking for a protein-packed snack, try adding:
- Protein Powder: Add a scoop of plant-based or whey protein powder to the mixture for an extra protein boost.
- Nut Butters: Use peanut butter, almond butter, or sunflower seed butter to provide a creamy texture and healthy fats while boosting protein content.
Sweeten Naturally
If you’re looking for a sugar-free option or want to rely more on natural sweetness, you can increase the number of overripe bananas. Their natural sugars will provide plenty of sweetness without needing extra sweeteners. You can also substitute sweeteners with stevia or monk fruit for a low-carb, sugar-free alternative.
Try Different Add-ins & Flavor Combinations
These bars are highly customizable! Check out these exciting variations to try:
- Chocolate Lovers’: Add chocolate chips or cacao nibs for a rich, indulgent treat.
- Nutty & Crunchy: Stir in chopped walnuts, pecans, or sunflower seeds for added texture.
- Fruity Twist: Add dried fruits like cranberries, raisins, or chopped dates to enhance the sweetness and flavor profile.
- Spiced Up: Add cinnamon, nutmeg, or a touch of vanilla extract for extra warmth and flavor.
Bake for a Chewier or Crunchier Bar
Depending on your texture preference, you can tweak the baking time:
- Chewier Bars: Bake for a slightly shorter time (around 18-20 minutes) and don’t let them get too golden on top.
- Crunchier Bars: For a crispier texture, bake for a little longer (around 25-30 minutes) or add slightly more oats to firm up the bars.
Boost the Protein: Add Protein Powder or Peanut Butter
If you’re looking to make your banana oatmeal bars a more filling and protein-packed snack, here are two great ways to give them a boost:
Protein Powder
- Adding protein powder to your bars is a fantastic way to increase their protein content, making them a great option for post-workout recovery or a satisfying breakfast.
- Use whey protein if you’re not vegan or opt for plant-based protein powders (such as pea protein, hemp protein, or brown rice protein) for a dairy-free alternative.
- For best results, add about 1/4 to 1/2 cup of protein powder to your mixture, depending on how high you want the protein content to be. You may need to slightly adjust the liquid (like adding a little extra nut butter or almond milk) to maintain the consistency.
Peanut Butter (or Other Nut Butters)
- Peanut butter, almond butter, or cashew butter not only add a creamy texture but also provide a natural source of protein, healthy fats, and fiber.
- Stir in about 1/4 to 1/3 cup of peanut butter to the mixture to boost the protein content while enhancing the flavor with a delicious nutty taste.
- If you prefer a different flavor, sunflower seed butter or cashew butter also work wonderfully as alternatives, each offering unique tastes while adding nutritional value.
Change the Texture: Make It Chewy or Crunchy with Different Oats
The texture of your banana oatmeal bars can easily be adjusted depending on the type of oats you use and how long you bake them. Here’s how you can customize the texture:
Chewy Texture
- Use Rolled Oats: Rolled oats provide a soft, chewy texture that works beautifully for banana oatmeal bars. This will give you that moist, dense consistency that’s perfect for a filling snack.
- Shorten Baking Time: If you prefer chewier bars, bake them for a slightly shorter time (around 18-20 minutes), just until the top is lightly golden but still soft to the touch.
Crunchy Texture
- Use Quick Oats: Quick oats are finer and absorb less moisture than rolled oats, which results in a slightly firmer texture that makes the bars more crispy.
- Add More Oats or Nuts: You can also add a bit more oats or even chopped nuts like walnuts or almonds to create extra crunch.
- Longer Baking Time: For crunchier bars, bake for a longer time (around 25-30 minutes) and let the bars get a bit more golden and crisp on the edges.
By adjusting the type of oats and baking time, you can easily make these bars as chewy or crunchy as you like!
Storage Tips: How to Store in the Fridge or Freeze for Later
These banana oatmeal bars are perfect for meal prepping, and proper storage will keep them fresh for days or even weeks! Here’s the best way to store them to keep them fresh:
Storing in the Fridge
- Refrigeration: To extend the shelf life of your bars, store them in an airtight container in the refrigerator. This will keep them fresh for up to 1 week.
- Pro Tip: If you want to keep them from sticking together, place a piece of parchment paper between layers of bars in the container.
Freezing for Long-Term Storage
- Freezing: If you want to store the bars for a longer period, freezing them is the best option. Wrap each bar individually in plastic wrap or place them in a zip-top bag.
- Label & Date: Make sure to label the bags with the date so you know how long they’ve been stored.
- Thawing: When you’re ready to enjoy them, simply thaw the bars at room temperature or heat them up in the microwave for 10-15 seconds for a warm, comforting snack.
Proper storage ensures that your banana oatmeal bars remain fresh and delicious, whether you’re enjoying them today or saving them for later!
FAQs About Banana Oatmeal Bars
Here are some frequently asked questions about banana oatmeal bars to help you with any doubts or queries you might have:
Can I make these bars without baking? (No-bake version ideas)
Yes, you can easily make a no-bake version of these banana oatmeal bars! Here’s how:
- Combine all ingredients: Mix the mashed bananas, oats, nut butter, and any add-ins (like chocolate chips or dried fruit) in a bowl.
- Chill: After mixing, press the mixture into a lined pan and refrigerate for 2-3 hours or until firm. This will allow the bars to set without needing to be baked.
- Add a Binding Ingredient: You can add chia seeds or flaxseeds as a binder to help the bars hold together in the fridge. These seeds will absorb moisture and give the bars more structure.
How long do banana oatmeal bars last? (Shelf life & storage tips)
The shelf life of your banana oatmeal bars depends on how you store them:
- At Room Temperature: If kept in an airtight container, they’ll stay fresh for about 4-5 days.
- In the Refrigerator: For longer freshness, store them in the fridge for up to 1 week.
- In the Freezer: If you want to store them for an extended period, freeze them for up to 3 months. Just wrap them individually in plastic wrap and store in a zip-top bag. Thaw before eating or warm them up in the microwave for a few seconds.
Can I make them without nut butter? (Alternatives & substitutions)
Yes, you can make banana oatmeal bars without nut butter! Here are some great alternatives:
- Seed Butters: Use sunflower seed butter or pumpkin seed butter as a nut-free option. These provide a creamy texture while adding a subtle nutty flavor.
- Applesauce: You can replace nut butter with unsweetened applesauce for a lower-fat option that still keeps the bars moist.
- Greek Yogurt: If you’re not following a nut-free diet, Greek yogurt can also serve as a replacement to add creaminess and protein without using nut butter.
Are these bars good for weight loss? (Nutritional benefits)
Yes, banana oatmeal bars can be a great choice for weight loss when consumed in moderation! Here’s why:
- High in Fiber: Oats and bananas are rich in fiber, which helps you feel fuller for longer and supports digestive health.
- Natural Sweeteners: Instead of refined sugars, these bars rely on the natural sweetness of bananas and honey/maple syrup, making them a healthier option.
- Healthy Fats: Nut butters or seed butters provide healthy fats, which are essential for satiety and can keep your energy levels stable.
- Protein Boost: If you add protein powder or use Greek yogurt or nut butters, these bars offer an added source of protein, which is crucial for muscle maintenance and weight loss.
While they are a nutritious snack, portion control is key—enjoy them as a part of a balanced diet, especially if you’re aiming for weight loss
1 thought on “How To Make Banana Oatmeal Bars – Quick & Nutritious Recipe”